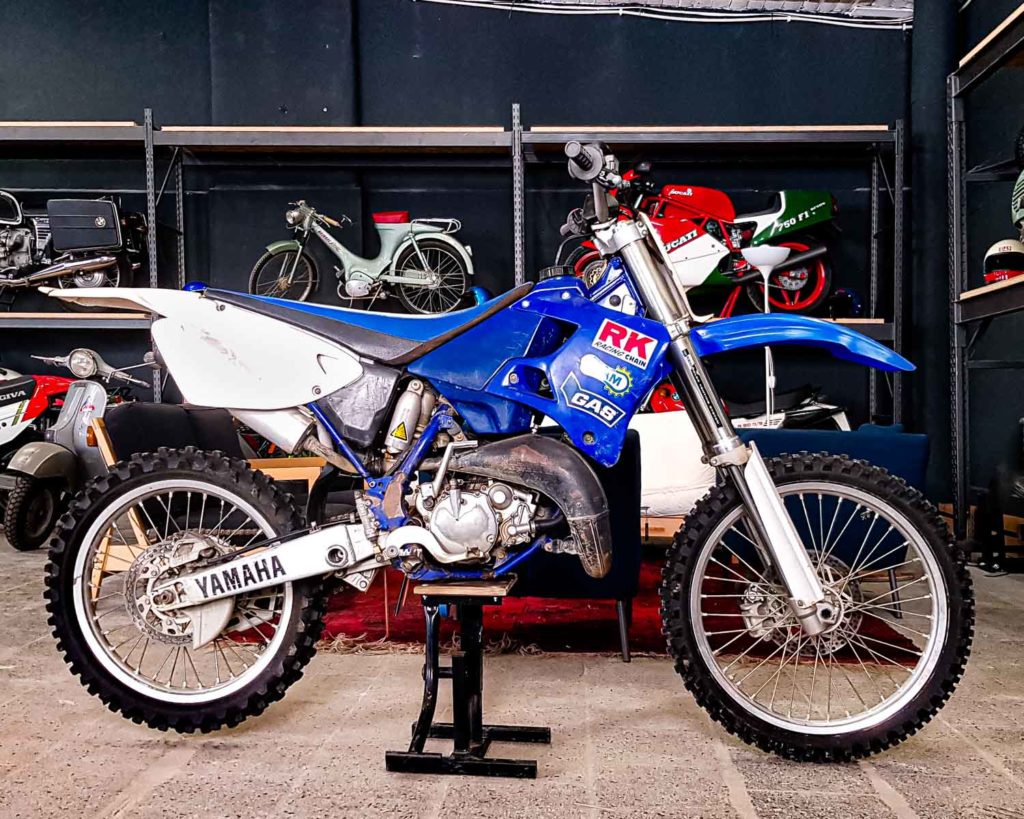
YZ 125 complete Rebuild

YZ 125 complete Rebuild finished | Stunning Transformation

Welcome back! The time has finally come, the Yamaha YZ 125 complete rebuild is finished and the bike is up and running.

It all comes together in this post. I’m finishing up the last few things on the YZ 125. And then let’s see if she starts. I’m really excited and I have learned so much. At the beginning of this project for example, the carburetor was for me like the monster under the bed for little kids. Scary but actually not that bad since it’s just in the mind.

Before the rebuild

This is what the YZ 125 looked like before the complete rebuild

Let’s kick things off

Let’s start with the sub frame. I have already wrapped the air box with carbon foil. Looks really good, I think. I’ll do a blog post in the future showing exactly how it’s done. Next, I oil the air filter thoroughly and install it.

The exhaust is also going back into place now.

Brakes

Now that the brake rotors are on (at least temporarily), I can fill the brake systems with brake fluid again. This is easier in the rear than in the front. For some reason, no pressure builds up in the front. In the end I use a big syringe to draw the brake fluid from below.

New fluids for the engine

Next, the engine gets new fluids. A new copper ring on the drain plug of the coolant seals everything well. Now I fill the radiator with as much coolant until both sides are full.
In addition, the engine gets 650 ml of gear oil.
And fuel must not be missing either. I mix the mixture in the ratio 1:33 directly in the 10 l canister.

Will the YZ start?

Fit the tank and pour in some of the good stuff. To ensure that the mixture reaches the carburetor, I quickly install a new fuel hose. Let’s see if it starts. On the first kicks nothing really happens. But then with a slightly opened throttle, the YZ is starts at the first kick. I am super happy! Only when I close the throttle the bike dies again. There must be a problem with the carburetor. I’ll have to check that again.

A new chain

But before that, let’s continue with some other things.

Next comes the chain. The chain shortening is quite fiddly without a vice. I had nothing to fixate the chain. But when I think about it now…cable ties would have helped for sure. Well anyway. I cut the chain on the ground. Being extra careful to not damage the lower chain link. The difficulty is that I have to remove exactly the right amount of material so that the bar is completely free. That means I can’t just cut the chain between the links. Otherwise, I wouldn’t be able to attach the chain lock. After a while, I’ve got both sides (rather bunglingly – don’t take my execution as an example) down to the point where they break, and I can push the rest of the link out.

The new chain has a clip chain lock. This is fairly common on motocross chains and relatively easy to install. It consists of the main part of the chain link, the counter plate, and the clip lock. First, I grease the two pins with the included grease and then put them through both ends of the mounted chain so that it is closed. Then, from the other side, I push on the counter plate until a small notch is visible on each bar. Now I place the clip lock so that it sits in the notches. The opening of the clip lock should point to the rear. Then the clip lock can be pushed onto the pins with a pipe wrench and the chain is fixed. New chain rollers are also installed.

Tighten the sprocket

As I said in the last part (https://www.motowrenchers.com/yamaha-yz-125-rebuild-part-3/), I can only tighten the sprocket to the proper torque when the chain and rear brake are installed. Now that the chain is in place and the rear brake also has its braking power back, I can use both to lock the rear wheel and with that also the sprocket. Now I can properly tighten the nut of the sprocket with my Proxxon torque wrench.

The next step is to tighten the chain. You can read how this is done in my pre-season checklist.

A little mistake

The last screws, I used as a replacement for the front brake disc, unfortunately did not fit. Therefore, I have dismantled the brake disc for the time being. Unfortunately, I made a mistake. Before tightening the axle at the bottom, you should compress the forks a few times. So, without thinking I pulled the front brake and tried to compress the front forks. But instead of compressing, the YZ 125 just rolled forward. I compressed the brake pads without the brake disc. Now the brake pads are so tight together that the brake disc no longer fits in between and it’s not really possible to get them apart.

Stupid, because I only wanted to tighten them for the time being, until the large 19 multi-Allen-key arrives.

I was always told that this is the worst. But it’s actually not a big problem. Just a little more work.

Fortunately, after a long time of waiting, the screws for the front brake disc arrived. So, I use those to install the disk, drain the brake fluid again and take off the brake pads. Next, I push the brake pistons back. Then reassemble everything and fill the system with new brake fluid. Nice, everything works, and I can tighten the front wheel with the extra-large Allen key.

New plastics

To round off the YZ 125 complete rebuild the bike gets a new plastic kit. If you want to see how now, here’s a video for you

Fixing the carb

Before I can ride, I have to check the carb. Spoiler alert, I spent another three hours figuring out the problem. I know that I have assembled everything according to the manual, but somehow the YZ always dies when I close the throttle. So, it runs too lean (?). First, I check all jets. Could be that the repair kit had different ones in it for some reason. That isn’t the case. So, I tweak the idle and pilot air screw to get it running. But even at the max it still doesn’t run smoothly.

The next day I take everything apart again and somehow notice a tiny, engraved number on the jet needle. Let’s see if it matches the one in the manual, I think to myself. There we have the villain. The package just contained the jet needle for the USA. No idea who puts something like that together and then sells it in Europe. However, I install the old jet needle with the right clip position and…tadaa! The YZ runs!!! On the first kick 🙂 I’m super happy.

Now I’ll take her for a few laps around the field.

Here are some pictures for you

I am very thankful for this project and what I learned from it. I hope you also had fun reading the story. Here’s my new project (https://www.motowrenchers.com/bmw-r80-custom-bike-project-day1/). You can aslo follow my projects on YouTube now. Follow me to not miss anything and see you soon, then live and in color – Wrench On!

Joshua

PS: Here you can read all the other parts

Support Moto Wrenchers

If you want to support Moto Wrenchers, you can become a Patreon.
I would highly appreciate it!

Courses I Can Recommend

Learn how to TIG weld with The Best TIG Welding Course.
I have used this online course to learn TIG welding and was amazed by the results. Click here to learn more.

If you want to learn more about the basics of fabrication, wiring, and welding check out the HPA Fabrication Courses and get $50 off of your first course.

More Content

More to read

Craftwerk Berlin

My new workshop Dear Wrenchers, in this post I will introduce you to the Craftwerk – a motorcycle community – where I will realize my

Read More »

As an Amazon affiliate, I earn on qualified sales that you make through one of the affiliate links. You pay the same price and I get a small commission which benefits the blog and new projects. Isn’t that great?! Thank you so much for your support. I really appreciate it.